Turning a kinda rubbish idea into a kinda cool webpage.
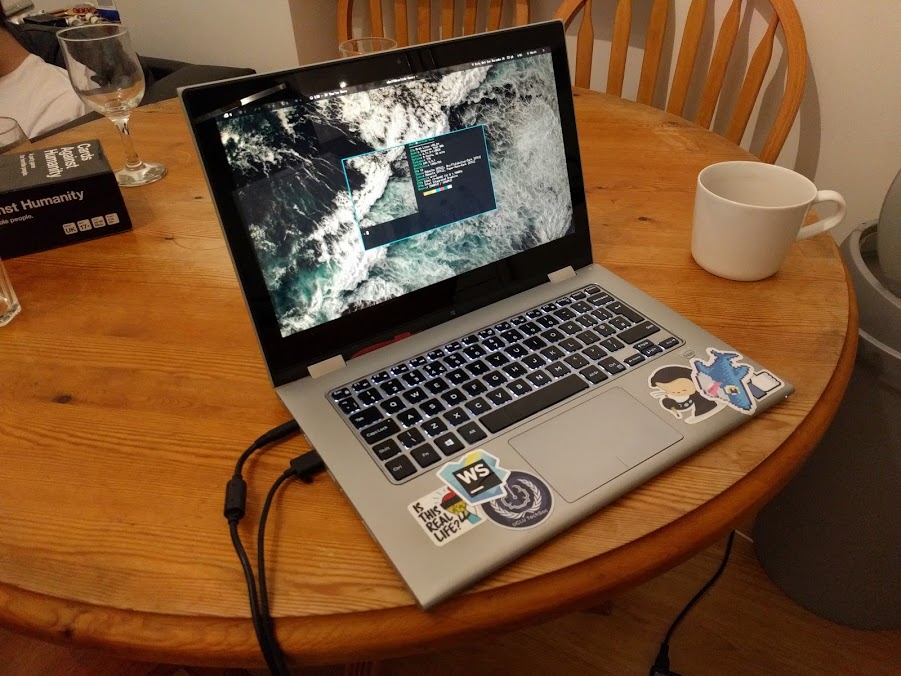
The end has finally come for my long-suffering laptop. It’s about to get replaced by something shinier, faster and lighter—and notably fewer stickers. I thought that it would be a total shame to just strip away all of the stickers from my laptop and sell it without a second thought, since each sticker kinda has its own story or situation surrounding it. It’s kinda lame but it’s almost like the case of my laptop is a journal of my hackathonning history. Sommething must be done to preserve it, right?
Introducing: the Stickerdex. By accessing the stickers page on my website, you’ll be able to find a list of my bestickered devices and see it from a bunch of different views:
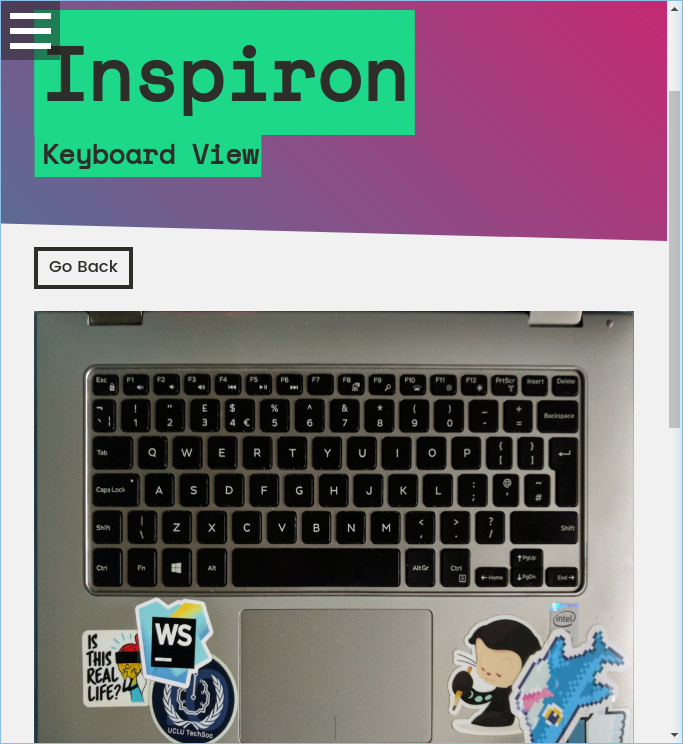
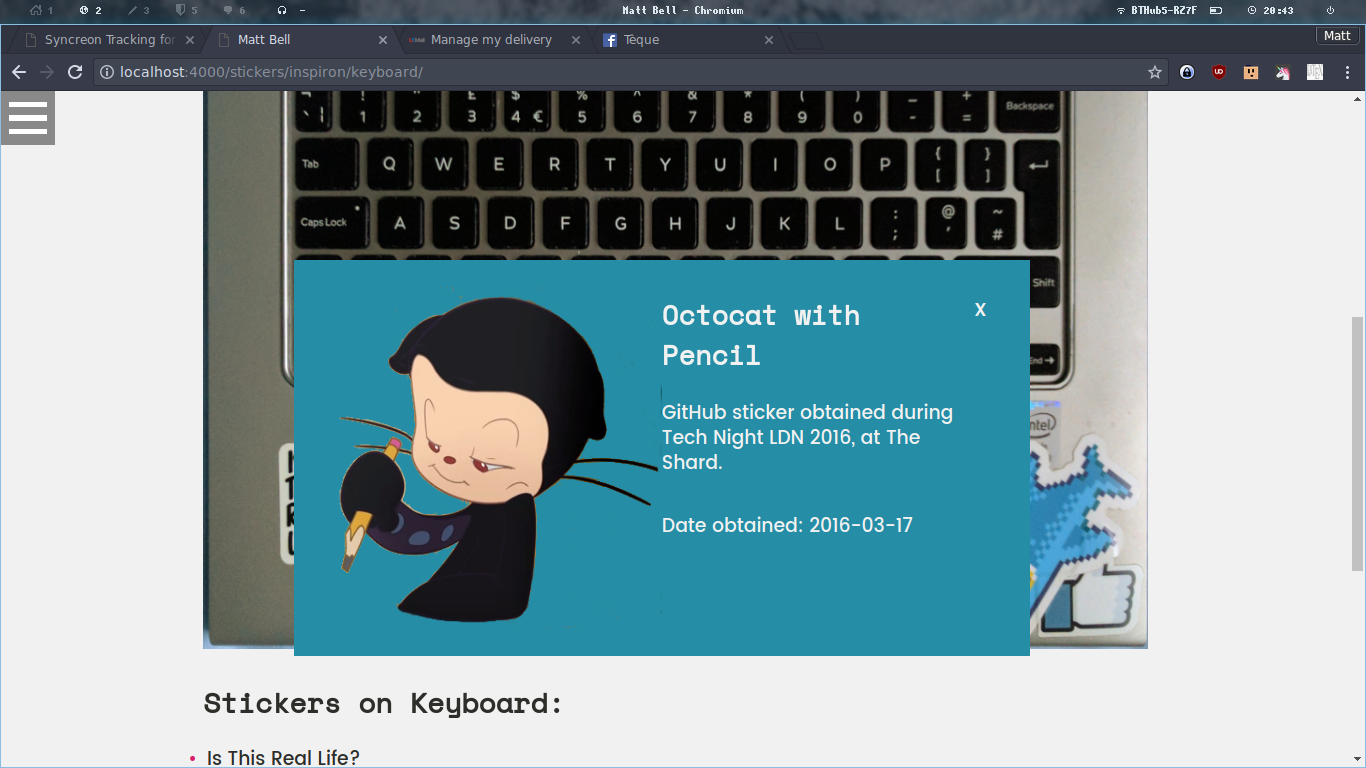
From here, you can click on the stickers shown to find out more information about that sticker’s origins:
It was something that I haven’t seen done before, and I also kinda thought it was a fun project to get stuck into. I hope you all enjoy looking through it, and the stickerdex is far from complete! Read on to learn about the build process.
The Build
I already had a rough idea of how the stickerdex would work, and that I would essentially need three things:
- An image of my laptop with the stickers on it,
- Some kind of map showing the position of the stickers on the laptop,
- A set of data explaining what each sticker is and its background.
The first part was super easy. I took a photo of each side of my laptop with a smartphone camera, then used The GIMP (my photo editor of choice) to pull and stretch the photo so that it was square. I also took the opportunity to fiddle with the colours to make sure everything is nice and clear.
The second part was a little trickier. I first tried using the “traditional”
image map (the <map> tag) to define the hotspots over my image, but there were
a few problems with this approach:
<map>appears below the<image>tag, which makes aligning it over the image and displaying a hover effect very difficult,<map>is not responsive, I would have to add a jQuery plugin to resize it—this is very costly to the user in terms of page loading time and page speed responsiveness.
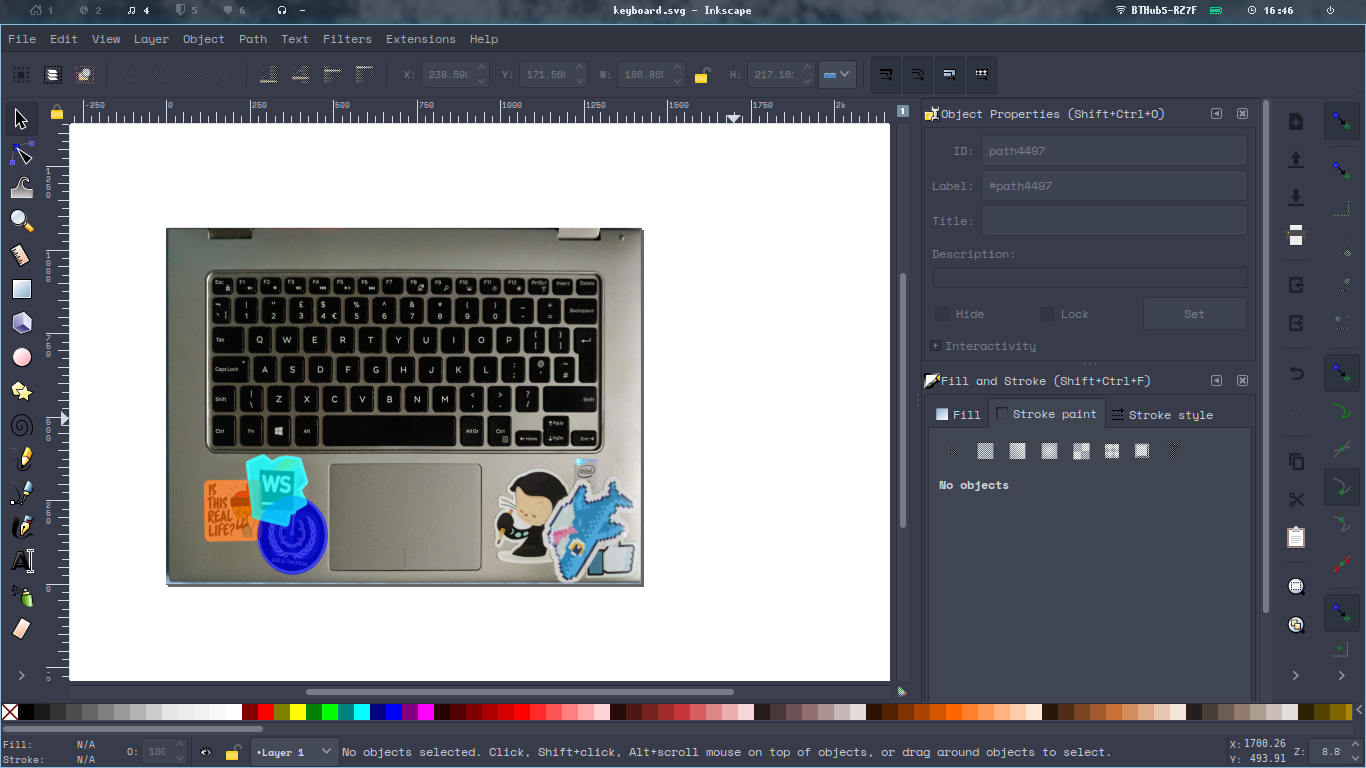
The solution I ended up going for was to create an SVG image with each sticker
defined as a <path> or an <ellipse> element. Then, I would copy these
elements from the source SVG file into a “stickers” HTML file. I wrote a Jekyll
template which would render this SVG fragment inside an <svg> tag, along with
an image which would be positioned behind it. The result is a responsive view,
which can be manipulated using the standard Javascript Web API and CSS (although
for now I’m using jQuery for ease of use still). My workflow kinda looks like
this:
- Open Inkscape (a free and open source vector graphics editor). Inkscape is one of the nicest and well developed free graphcis programs, and easily holds its own against big industry competitors like Adobe Illustrator.
- Import the laptop photo as a layer, resize canvas to match, and lock this layer. I can now trace over the stickers in the image. Make sure that you choose to import as a “link” rather than an “embed”, since this will save on file space.
- Start drawing shapes/ellipses over the image, using a fill to keep track of
what stickers have been captured. It’s also important to remember to set the
idattribute of the image in the object properties sidebar; this is so that we can reference it later. - Once done, save the SVG file in a sensible place. Now we can get on to the coding bit.
Jekyll Templating FTW
The best bit about using Jekyll is how versatile its templating engine is. For
this scenario, I’m using a collection called stickers which contains a bunch
of SVG fragments; these will then get generated into full HTML pages.
I first create the directory for the collection, _stickers. My preference is
to group each devices’ views inside their own directories, meaning that my
directory structure looks like this:
_stickers
- /<device>
  - /<device_view_1>.html
  - /<device_view_2>.html
One example file might look a bit like this:
---
name: "Device Name"
view: "Back"
---

<path
  style="..."
  d="..."
  id="myStickerName" />
<ellipse
  style="..."
  cx="..."
  cy="..."
  rx="..."
  ry="..."
  id="myRoundSticker" />
<!-- etc... -->
To get to this stage was relatively straightforward. I copied all of the
<path> and <ellipse> tags from my source SVG file that represented stickers,
and dumped them into the file. The name and view keys in the front matter
are just there to make the page have nicely formatted titles.
Oh yeah, quick tip. Jekyll will render anything, whatever the file extension,
with its own formatting style (i.e. {{ tags }}) as long as
you include a front matter. Even if it’s empty! Think about that when generating
JSON files or anything else that’s fancy. Anyway, the next thing we need to do
is create our JSON data file with all the awesome information about our
stickers.
Jekyll supports this idea of having a “single source of truth” for your data, so
it allows you to import JSON, YAML and XML files straight into the templating
engine. Ain’t that cool? We’re going to do the same, to populate our sticker
set. Here’s an example JSON file. It should be stored in the _data directory,
and the name you give it is how it’s referenced in Jekyll, so for clarity’s
sake, I’m calling it stickers.json:
{
  "devices": [
    {
      "name": "Laptop",
      "description": "My cool laptop.",
      "img": "/photo/of/my/laptop.jpg",
      "views": [
        {
          "name": "Back",
          "src": "/path/to/photo/of/the/back/of/laptop.jpg",
          "width": 1422.4,
          "height": 1066.8,
          "viewbox": {
            "width": 1422.4,
            "height": 1066.8
          },
          "stickers": [
            {
              "name": "Is This Real Life?",
              "id": "isThisRealLife",
              "date": "2015-11-07",
              "description":
                "Obtained via sticker pack from a Capture The Flag (CTF) security event at Facebook's London offices.",
              "img": "/assets/img/stickers/inspiron/is-this-real-life.png"
            },
            {}
          ]
        }
      ]
    }
  ]
}
My JSON file has been designed to allow for as many devices and views of said
devices as I need. It’s very configurable! So for each device I define, it
includes a name, description and image. These are all used for the index page.
The views key is an array of the views of this device—for instance, front
and back.
For each view, it contains the following:
name: the name of the view. make sure this is consistent with the HTML file you made earlier so that they can link up easily.src: the path to the source of the background photo. Since we’re not using the SVG used to trace our stickers, we need to drop the image in ourselves.widthandheight: width and height of the SVG file. They’re is normally the same as theviewboxvalues, but it’s nice to have just in case they’re not.viewbox: the width and height of the SVG viewbox. Think of this as a resized “window” looking into your SVG file. This is the size of the canvas that your shapes get their coordinates from. You can find this in the Inkscape document settings.stickers- an array of this view’s stickers.
Each sticker should, at the bare minimum, have a name and id. The id
must be the same as the id used in your SVG file for that sticker.
Otherwise, the two can’t link up! Make sure you don’t use dashes in your ids,
since JSON doesn’t support these. The other fields are up to you; depending on
how much detail you want to include.
Now, we need to update the _config.yml file to actually create this stickers
collection.
collections:
  stickers:
    output: true
    permalink: /:collection/:path
# [... could be stuff here ...]
defaults:
  # [... could be stuff here ...]
  - scope:
      path: ""
      type: stickers
    values:
      layout: sticker
This addition to your _config.yml defines the stickers collection, telling
Jekyll to render it and to place each sticker under /:collection/:path, where
:collection is the collection name (“stickers”), and :path is the relative
path of each file from the _stickers directory (so for
_stickers/myDevice/back.html, :path would be myDevice/back/. Super handy
for grouping together devices).
The defaults section allows us to define defaults for the collection. Like,
oh, I don’t know… a template for our collection? This simplifies our stickers
files somewhat. We should now write that template file. Mine is available on
GitHub,
or you can use this example below:
{% include "header.html title=page.name subtitle=page.view" %}

{% assign sticker_set_name = page.name | slugify %}
{% assign sticker_view_name = page.view | slugify %}
{% assign sticker_set = site.data.stickers.devices | where: "name", page.name | sample %}
{% assign view = sticker_set.views | where: "name", page.view | sample %}

<svg
  class="stickerView"
  version="1.1"
  xmlns="http://www.w3.org/2000/svg"
  xmlns:xlink="http://www.w3.org/1999/xlink"
  viewBox="0 0 {{view.viewbox.width}} {{view.viewbox.height}}"
  preserveAspectRatio="xMinYMin meet">

  <image
    width="{{ view.width }}"
    height="{{ view.height }}"
    xlink:href="{{ view.src }}" />

  {{ content }}

</svg>

<script>
var stickers = {};
{% for sticker in view.stickers %}
stickers.{{ sticker.id }} = {{ sticker | jsonify }};
{% endfor %}
</script>
There’s loads to take in here. Firstly, we set the sticker_set_name and view
variables, lifted from the page front matter. Next, we use these variables to
filter through our sticker data for the correct device and view. The sample
filter means “pick one at random”. I added this because the where filter
returns an array of length 1 in our case, and it just saves line length!
The next thing to do is to create our SVG in the page. Notice how I’m
substituting out various tag attributes (e.g. viewBox) for the variables
defined in our JSON file? The <image> tag is how images are defined in SVG
files. The image will always scale to match the overlays, which is a nice side
effect of using SVGs over the <map> tag. Finally, we drop in the {{ content }} tag, which renders all the SVG elements we copied over
earlier. Congrats, we now have an SVG statically rendered for each sticker view!
That final script tag is something I’m using to define a stickers object in
the page, which will be called upon in my code when clicking on each overlay. I
use var so that the variable persists across the entire document, not just
inside that <script> element. Later on, I have a jQuery event handler which
looks a bit like this:
$(".stickerView path, .stickerView ellipse").click(function() {
  // can't use arrow functions here. we need the `this` variable.
  const id = $(this).attr("id");
  // using the stickers variable from earlier...
  const sticker = stickers[id];
  $("#stickerName").text(sticker.name);
  $("#stickerDescription").text(sticker.description || "");
  // etc...
});
I also use this event handler to pop all the information into a modal box and render it on top of the page content, but that’s a topic that’s a little out of scope for this article. Other tricky things included trying to restore stickers that literally don’t exist anymore, but a little image editing magic should sort this out easily enough.
All of the code for this is available on my website’s repository. Hopefully this has been useful. Please make an issue on the repository (or contact me) if you have any questions, and make a pull request if you have a suggestion. Thanks for stopping by!